eslint plugin 开发笔记
eslint plugin 开发笔记
新建项目
1 | npm install -g yo generator-eslint |
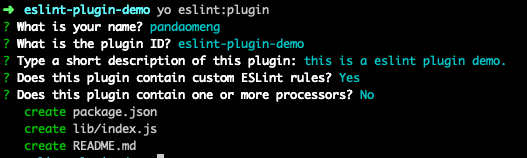
目录结构如下:
1 | . |
接着执行
1 | yo eslint:rule |
此时目录结构如下:
1 | . |
无须发包,使用 npm link 在项目中别的项目做测试
在 eslint-plugin-demo 目录下执行
1 | npm link |
控制台会输出
1 | /usr/local/lib/node_modules/eslint-plugin-demo -> /Users/your-name/workspace/eslint/eslint-plugin-demo |
然后在需要使用该 npm 包的项目中执行
1 | npm link eslint-plugin-demo |
控制台会输出
1 | /Users/your-name/workspace/eslint/eslint-example/node_modules/eslint-plugin-demo -> /usr/local/lib/node_modules/eslint-plugin-demo -> /Users/daomeng.pan/workspace/eslint/eslint-plugin-demo |
如果需要解除 link ,则直接删除项目中 node_modules 下的软链接即可
1 | rm /Users/your-name/workspace/eslint/eslint-example/node_modules/eslint-plugin-demo |
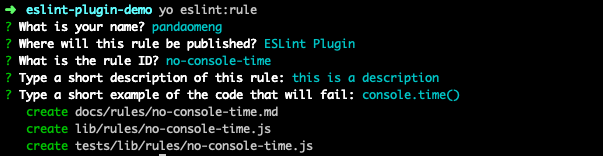
编写 eslint rule
yo eslint:rule 生成的模板文件如下
1 | /** |
meta
- docs
- description: rule 的描述
- category: rule 所属的类目,参考 eslint 官方提供的 rule,有:’Best Practices’、’Stylistic Issues’、’Possible Errors’、 ‘Variables’ 、’Strict Mode’、’ECMAScript 6’ 、’Deprecated’ 、 ‘Removed’等,详见 https://eslint.org/docs/rules/
- recommended: 当 eslint 配置中开启 “extends”: “eslint:recommended” 时,是否启用这条规则。
- schema: 使用 Json schema 语法描述 eslint 可接收的 options 的结构
- fixable: 在使用
--fix的时候是否自动修复
- docs
create: (function) 返回一个对象,其中包含了 ESLint 在遍历 JavaScript 代码的抽象语法树 AST (ESTree 定义的 AST) 时,用来访问节点的方法。
create 方法举例
我们可以借助 ast语法树分析网站,在里面得到我们的语法树
1 | module.exports = { |
对 import 语句的校验
使用 eslint-module-utils 提供的方法可以提高开发效率
例
1 | const { default: moduleVisitor } = require('eslint-module-utils/moduleVisitor'); |
参考源码 https://github.com/benmosher/eslint-plugin-import/blob/master/utils/moduleVisitor.js
context 对象
create 函数接收一个 context 对象
提供了很多常用的方法和属性,包括 getSourceCode() 获取源码、getFileName() 获取文件名、context.options 获取配置的参数(schema 中约定好的结构) 等